
If you have a Keurig, you won’t need to worry about managing filters and ground coffee every morning. But many of us are guilty of not thinking about cleaning it often enough either — and that thing can get dirty.
If they are not regularly cleaned, Keurigs, like all coffee makers and single-serve coffee makers, as well as other household appliances like dishwashers, washing machines, and ovens, can become a haven for mold and bacteria that can be harmful to humans.
Not only will routine cleanings increase the lifespan of your appliance and safeguard your health, but they’ll also keep your coffee tasting great every day.
So read on to find more about how to clean a keurig coffee machine.
How To Clean A Keurig Coffee Machine?
What You Need
Ingredients
- Soap
- White vinegar or descaling solution
- Water
Equipment
- Clean, dry cloth
Instructions
- Unplug the machine:It’s a straightforward but significant step.
- Disassemble and wash removable parts:Remove the K-cup holder, the water reservoir, and its lid. Dry off after washing with warm, soapy water.
- Wipe machine surface:Wipe the machine’s surface with a fresh, dry cloth (or a damp one, if necessary). Remember to clean up any coffee or tea granules that may have amassed around the coffee pod holder. Connect the machine, then replace all the removable components.
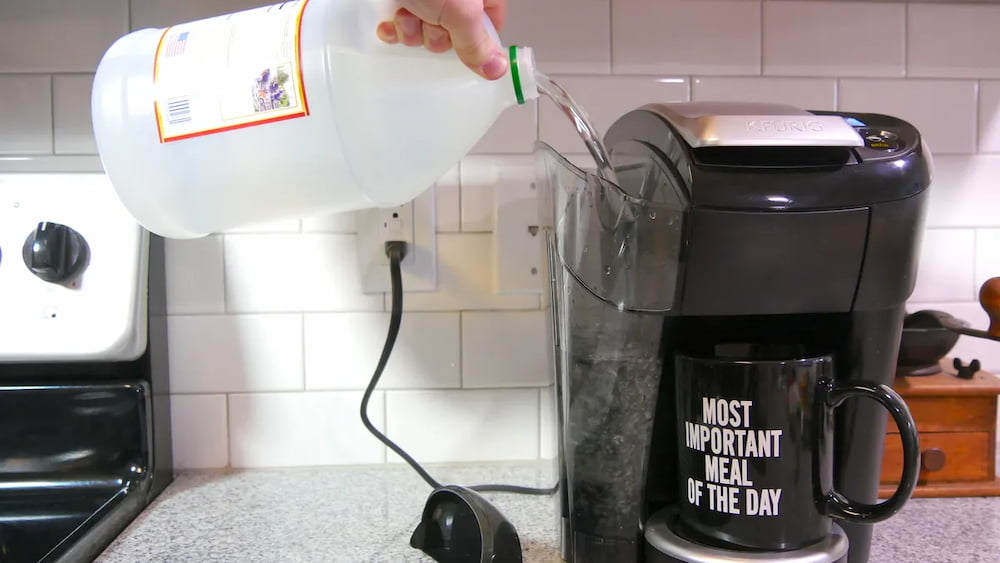
- Grab the vinegar: Your coffee maker needs to be descaled in order to function properly, which involves removing lime and scale buildup. White distilled vinegar can help. (Descaling solutions are another option.) Add vinegar to halfway full the water reservoir.
- Add water: Water should be poured into the reservoir until it is completely full.
- Run the machine: Without a K-cup, start the brewing process. Continue until the reservoir is empty, discarding the contents of the mug between each round of brewing. This procedure will aid in removing lime and scale accumulation. Depending on your water source, Keurig suggests descale your brewer no less frequently than every three to six months.
- Repeat rinse with water:To get rid of any remaining vinegar flavor, repeat the procedure using only plain water in the reservoir.
- Use as usual: When you’re ready, you can make a cup of coffee as usual.
The Keurig Coffee Maker Needs To Be Cleaned, But Why?
You might believe that since you only use clean water in your Keurig, its interior will never require cleaning. However, calcium, magnesium, and other minerals leave traces in your machine after every refill. Where you live will determine the quantity and type of each. Some areas have water that’s “harder” than others, meaning the water has more dissolved minerals in it than are found in other places. Your machine’s maintenance may benefit from knowing what type of water you have. More residue will accumulate in your machine as your water becomes harder.
The residue forms as a result of chemical combustion that takes place as the water heats up in your Keurig, which causes the minerals to leach out of the water. Minerals are left on your Keurig’s metal components after the water drains, forming a coating. If that coating isn’t removed, it eventually piles up and becomes scale, which is difficult to remove. Depending on your location, it might be calcium scale, limescale, or another type.
How Often Should A Keurig Be Cleaned?
Waiting for the PRIME message to appear on your Keurig coffee maker is never a good idea. Some devices do have an automatic reminder that will appear just in time. If your machine doesn’t have that feature, Keurig advises descaling it as a preventative maintenance measure every two to three months. If you’re a heavy user, you should probably do it closer to that two-month point. You might want to do it even more frequently if you are aware that your water is harder than average.
Some claim that as the scale rises, their coffee tastes a little bit differently. However, scale buildup rarely alters the flavor of plain water, so it might not be apparent in your coffee. The need to descale your Keurig cannot really be determined by taste alone. In case you’re unsure, a quick flashlight inspection will reveal scale on the inside of your machine. Descale it if you see it.
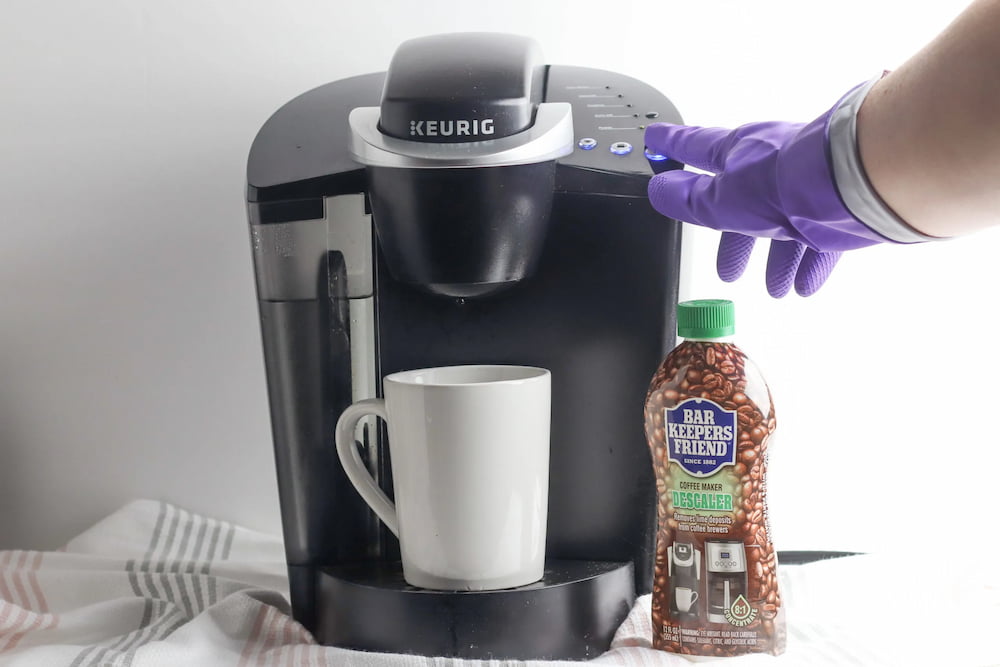
Use Vinegar Or Keurig’s Descaling Solution
Which cleaning solution is a better option? you might be wondering. The solution is that both options are functional, though Keurig’s descaling solution is superior and won’t necessitate additional cleaning cycles.
We noticed in the manual that if your machine should malfunction during your warranty period and you had cleaned it with something other than You would void your warranty if you used Keurig’s Descaling Solution. Although the vinegar is less expensive, it might be less expensive overall to use the Keurig product in the event that you ever need a warranty repair or replacement. Keep reading for our full list of pros and cons:
Vinegar:
Just plain white vinegar—nothing colored or derived from rice, apple cider, or anything else—is what we’re discussing here. We’re talking about plain white vinegar, which is available in big plastic jugs and has been used as a cleaning agent for many years.
Pros
- Relatively inexpensive
- You can find it in any grocery store or market
- Non-toxic and environmentally friendly
Cons
- Not as effective at descaling
- Not recommended by Keurig
- May void your warranty
Keurig Descaling Solution:
In order to clean these coffee makers, Keurig sells a descaling solution. All of Keurig’s automatic, manual, pod and K-cup, and commercial equipment is compatible with the descaling agent they produce.
Pros
- Can be used to clean tea kettles and other appliances
- Specifically designed for Keurig machines
- Readily available online
Cons
- A little more expensive
- Harder to find in grocery stores
Replace Your Water Filter Every Two Months:
Every other month, you’ll want to replace the water filter cartridge to keep your coffee tasting fresh.
What You Need
- Water filter cartridges
Instructions
- Fresh water should first be used to soak a new water filter cartridge for five minutes, followed by a 60-second rinse.
- The lower filter holder’s mesh should be cleaned.
- Snap the lid on after placing the cartridge into the top filter holder.
- Reinstall it in your reservoir and secure it there at last.
Descale Your Keurig Every Three To Six Months:
Your machine’s functionality may be impacted by the accumulation of hard water minerals over time. To prevent this, you’ll want to descale your Keurig at least twice a year.
What You Need
- Distilled white vinegar or Keurig Descaling Solution
Instructions
- Start the descaling procedure by adding 16 ounces of white vinegar or Keurig Descaling Solution to the reservoir, followed by 16 ounces of water.
- Start the largest brew size cycle without a K-cup and let the machine run normally while using a mug to catch the liquid.
- The ADD WATER indicator will not turn off until you keep doing this.
- Give the brewer 30 minutes to rest.
- The reservoir should be completely emptied and cleaned. In order to get rid of any vinegar or descaling solution residue, fill it up to the MAX line with fresh water and run 12 rinse brews using the largest brew size.
- Brew coffee as usual.
Clean Keurig Needles As Needed
If you see grounds in your K-cup holder, wipe them out with a sponge to keep them out of your drink the following morning. The needles that punch the entrance and exit points where the water flows through the K-cups may also have coffee grounds stuck in them if you’re still having trouble brewing.
What You Need
- K-cup holder
Instructions
- Unplug the machine.
- Disconnect the pod holder from the funnel, then use a paperclip to carefully remove any obstructions that may have become lodged in the exit needle.
- Although it has two holes that need to be cleaned, the entrance needle underneath the brewer head can also be cleaned with a paper clip.
- Before reassembling, clean the pod holder and funnel.
Use the brewer maintenance accessory if you have a Keurig Plus or 2.0 model instead.
You won’t have to worry about anything other than coffee in your morning brew as long as you follow these instructions (unless you like yours with milk and sugar, of course!).
Final Words
Now that you know how, go ahead and clean and descale your Keurig coffee maker! It will be easy for you to maintain it so that it continues to brew the delicious cups of coffee you’ve come to expect from this handy device. Our recommendation is to descale your Keurig with Keurig’s Descaling Solution every two to three months if you want to keep it operating efficiently and completely. Otherwise, it might simply develop into an inconvenient monster with a warranty issue!
I appreciate your reading.
Read about